MVVM 是一个强大的架构,基本从 WPF 开始,wr(我说的就是微软)就提倡使用 MVVM。它可以将界面和后台分离,让开发人员可以不关心界面是怎样,全心投入到后台代码编写中。 然后在编写完后台代码后,可以快速和界面设计师做出来的界面绑定到一起,即使频繁修改界面也几乎不需要去修改后台代码。 更让人喜欢的是,他可以让我们简单地进行单元测试,因为我们可以不打开界面进行测试功能,方便了我们的测试开发。 UWP 虽然可以直接在xaml.cs 写逻辑但是我们是推荐使用 MVVM 框架,写一个自己的框架也很简单。 本文主要:如何在 UWP 使用 MVVM,如何做一个自己的框架。
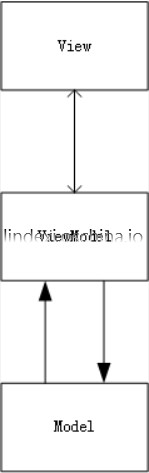
MVVM 是 View、Model、 ViewModel 合起来的称呼。
-
View 就是界面。软件中,可以这样看,我们看到的都是界面,看不到的就是后台,在 UWP 中我们说的 View 一般是
pageUserControl等。我们写界面时用 xaml 和 cs 结合起来,做出好看的效果。 -
ViewModel 是界面的抽象,这里我们不需要去理会界面长什么样,我只需要知道我们需要给界面提供什么。这就是说我们可以不管界面而将业务逻辑抽象出来。ViewModel 可以简单单元测试,因为我们不需要打开界面。
-
Model 是核心逻辑,有些大神说, Model 只定义数据结构,有些大神说 model 写核心逻辑,这个就仁者见仁智者见智了。我是将核心逻辑写进 Model,如果觉得这样不对,欢迎讨论。
但是我们现在的问题是怎么让 ViewModel 抽象 View,随后简单地把界面联系起来呢?
使用 Binding 即可,这是 WPF 强大的地方,而 UWP 继承并发扬了这些特性。
如果希望知道 MVVM 是如何写,为何需要使用 MVVM ,戳此链接 http://www.cnblogs.com/indream/p/3602348.html
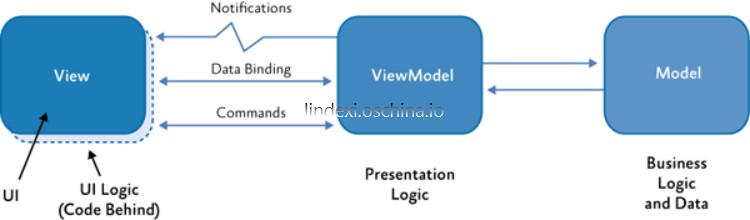
关于 Model 是属于哪些代码所放的地方,我找到一篇博客,在 CodeProject,也是最近10月写的,依照他的逻辑,是支持 Model 写业务逻辑,ViewModel 写表示逻辑的看法。请看下面图片,博客在:https://www.codeproject.com/Tips/813345/Basic-MVVM-and-ICommand-Usage-Example
我们下面说下绑定。
绑定
我们有多种方式绑定 ViewModel 。关于 ViewModel 实现的位置有下面几种。
-
写在xaml.cs,这是最简单的方式,可以使用代码或在xaml绑定DataContent和ViewModel
-
写成 xaml 静态资源,这个方式我们使用次数还是比较多,可以让 Code 不写代码就可以绑定 DataContent 和ViewModel
-
写在一个 ViewModel 静态类,我们把其他页面的 ViewModel 统一写到一个 MainViewModel ,而且他是静态或只有一个实例,这样可以在任何地方调用到。
-
写在 App.xaml 静态资源。这个方式和写在 xaml 差不多,只是可以在 xaml 设置 Page 的 DataContent 。
-
写在App.xaml一个静态 ViewModelLocate 包括用到的 ViewModel 。这个方式是 MVVMLight 做的,我模仿他的想法,推荐使用这个方法。
下面我简单介绍这几种方式。
最简单的方法,是在xaml.cs 写一个 ViewModel ,假如我们的 ViewModel 叫 Linmodel ,我们可以在 xaml.cs 写类似下面的
        public MainPage()
        {
            ViewModel = new LinModel();
            this.InitializeComponent();
            DataContext = ViewModel;
        }

        private LinModel ViewModel
        {
            set;
            get;
        }
我们也可以把 ViewModel 换成其他名字,遇到需要具体什么名称就使用最好的。
注意我们的ViewModel 实现的地方一般是在InitializeComponent之前,也就是放在类的构造的最前或直接如下面一样
        private LinModel ViewModel
        {
            set;
            get;
        }=new LinModel();
这个方式是6之后才有的,初始化值可以写在自动属性定义。 因为我们需要的 ViewModel 几乎不会修改,所以我们还可如下面,去掉set 。很少会在实现 ViewModel 后在别的地方修改。但是我们在后面会看到,我们使用了页面导航传参,传的是 ViewModel ,这时我们就不能设置 set 去掉。但我们可以设置 private set;
        private LinModel ViewModel
        {
            get;
        }
因为我们不需要使用 public ,我们就可以这样简单写 ViewModel ,除了需要记得我们的ViewModel 的实现需要在InitializeComponent之前,还需要记得 DataContent 需要在InitializeComponent之后。
DataContent 的另一个写法是写在 xaml ,很简单,这个方法我们要修改ViewModel 的访问private为public,下面代码写在页面Page
DataContext="{Binding RelativeSource={RelativeSource Self},Path=ViewModel}"
RelativeSource 可以绑定到xaml.cs,我们就简单可以从 cs 获得 ViewModel
这是一个简单的方法。
我建议大家把 DataContext 写在 xaml ,至于为何这样是我推荐的,卖个关子,大家自己试试,把 DataContext 写在xaml.cs和 xaml 中看下 xaml 的提示补全,就知道为何推荐这个方法。
说完了简单方法,我们来说下 ViewModel 写在 xaml ,xaml.cs不写代码这个方式。 ViewModel 需要有 static 的属性,这个属性的类就是ViewModel本身,也就是 ViewModel 可以实现的只有一个。当然 static 不是必需的,我们依靠静态资源就可以绑定到 ViewModel 的属性,从而绑定 ViewModel 。
    <Page.Resources>
        <view:LinModel x:Key="LinModel"></view:ViewModel>
    </Page.Resources>
        <Grid DataContext="{Binding Source={StaticResource LinModel},Path=ViewModel}">

        </Grid>
    public class LinModel
    {
        public LinModel()
        {
            ViewModel = this;
        }

        public static LinModel ViewModel
        {
            set;
            get;
        }//让绑定可以访问 ViewModel ,其实这里我们也可以不使用static
    }
注意我们不能把 DC 写在 Page ,如果写在 Page ,运行Cannot find a Resource with the Name/Key
我们用到 staticResource ,我们为了可以在页面使用 DataContent ,我们可以把静态写在App.xaml
<Application
    x:Class="JiHuangUWP.App"
    xmlns="http://schemas.microsoft.com/winfx/2006/xaml/presentation"
    xmlns:x="http://schemas.microsoft.com/winfx/2006/xaml"
    xmlns:local="using:JiHuangUWP"
    xmlns:view="using:JiHuangUWP.ViewModel"
    RequestedTheme="Light">
    <Application.Resources>
        <ResourceDictionary>
            <ResourceDictionary.MergedDictionaries>
                <ResourceDictionary>
                    <local:LinModel x:Key="LinModel"></local:LinModel>
                </ResourceDictionary>
            </ResourceDictionary.MergedDictionaries>
        </ResourceDictionary>
    </Application.Resources>
</Application>


<Page
    x:Class="Framework.MainPage"
    xmlns="http://schemas.microsoft.com/winfx/2006/xaml/presentation"
    xmlns:x="http://schemas.microsoft.com/winfx/2006/xaml"
    xmlns:local="using:Framework"
    xmlns:view="using:Framework.ViewModel"
    xmlns:d="http://schemas.microsoft.com/expression/blend/2008"
    xmlns:mc="http://schemas.openxmlformats.org/markup-compatibility/2006"
    DataContext="{Binding Source= {StaticResource LinModel},Path=ViewModel}"
    mc:Ignorable="d">
我们这个写法可以让 cs 不写代码,如果我们有多个相同页面,那么我们不可以使用这个办法。
我们要把static去掉也是可以,这是这样我们在 Code 就不能使用LinModel.ViewModel 获得 ViewModel 。我们上面办法是可以不再 Code 写代码,所以去掉static,其实影响几乎没有
    public class LinModel
    {
        public LinModel()
        {
            ViewModel = this;
        }

        public /*static*/ LinModel ViewModel
        {
            set;
            get;
        }
    }
那么去掉了 static ,是不是我们就没有办法在 xaml.cs 获得 ViewModel ?在软件开发中,怎么可以说不可能呢,我们有一个简单的方法。我们不是从 DataContext 绑定 ViewModel ,那么 DataContext 就是 ViewModel ,我们拿出 DataContext 转换,于是得到 ViewModel 。注意 DC 写的地方,千万不要在一开始写,如果发现你的 DC 是 Null ,那么你写的肯定不对
            InitializeComponent();
            ViewModel = (LinModel) DataContext;
这是一个简单方法,其实有一些比较难做,我将和大家说去做一个自己的框架。
我们说完了在App.xaml 使用静态资源,还没说如何写一个类,包含我们的 ViewModel ,然后写出静态资源,我们所有的 ViewModel 都从他这里拿。
我们下面开始说这个方法,这个方法是 MVVMLight 使用的,想要看 MVVMLight 入门的,请去看叔叔写的入门:http://www.cnblogs.com/manupstairs/p/4890300.html
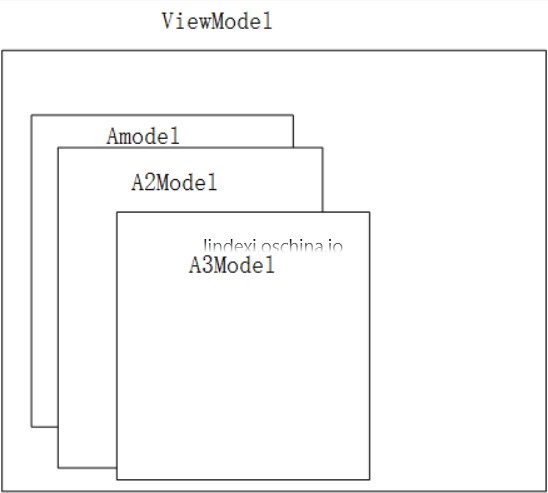
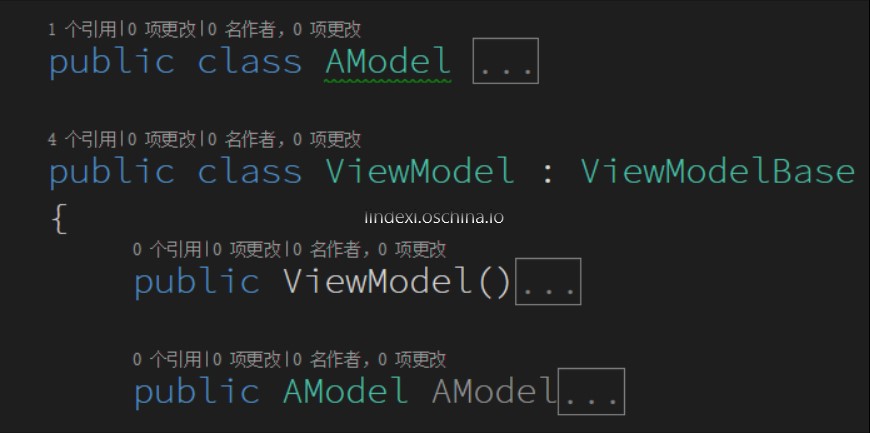
我们定义个类,这个类叫 ViewModelLocater ,假如我们有两个 ViewModel ,一个是 AModel ,一个是 LinModel ,那么我们在 ViewModelLocater 写两个属性。
        public AModel AModel
        {
            set;
            get;
        }

        public LinModel LinModel
        {
            set;
            get;
        }
然后在 App.xaml 写静态 ViewModelLocater
    <Application.Resources>
        <ResourceDictionary>
            <ResourceDictionary.MergedDictionaries>
                <ResourceDictionary>
                    <view:ViewModelLocater x:Key="ViewModelLocater"></view:ViewModelLocater>
                </ResourceDictionary>
            </ResourceDictionary.MergedDictionaries>
        </ResourceDictionary>
    </Application.Resources>
这样我们就可以在 APage 和 LinPage 的 Page 写 DataContent 绑定ViewModel
<Page
    x:Class="Framework.View.APage"
    xmlns="http://schemas.microsoft.com/winfx/2006/xaml/presentation"
    xmlns:x="http://schemas.microsoft.com/winfx/2006/xaml"
    xmlns:local="using:Framework.View"
    xmlns:d="http://schemas.microsoft.com/expression/blend/2008"
    xmlns:mc="http://schemas.openxmlformats.org/markup-compatibility/2006"
    DataContext="{Binding Source={StaticResource ViewModelLocater},Path=AModel}"
    mc:Ignorable="d">
这样,我们就不需要在每个 ViewModel 写一个和类型是 ViewModel 的属性。
当然,这个方法还可以让所有的 ViewModel 继承一个类,做出 ViewModel 数组,保存所有的 ViewModel ,然后做一个索引,这样在添加一个新的 ViewModel ,我们只需要在数组添加一个,不需要添加一个属性。那么我们每添加一个 ViewModel ,还要去手动添加数组一个 ViewModel 实在就得不好,有没一个方法让我们的软件自动去把所有的 ViewModel 添加到数组?当然有,请看反射获取所有类
反射获取所有类
我们用使用反射,首先我们需要知道反射是什么?
Reflection ,中文翻译为反射。
这是 .Net 中获取运行时类型信息的方式,.Net 的应用程序由几个部分:‘程序集(Assembly)’、‘模块(Module)’、‘类型(class)’组成,而反射提供一种编程的方式,让程序员可以在程序运行期获得这几个组成部分的相关信息。
所以我们可以使用反射获得软件的所有类,获取全部 ViewModel 类。我们可以在 ViewModelLocater 使用 ViewModel 数组,使用反射获得所有 ViewModel ,知道添加他们到数组。好处是:我们添加一个 ViewModel 类时,不需要去修改 ViewModelLocater 。
我们需要一个识别 反射得到的类是属于我们 ViewModel 的方法,很简单,假如我们的 ViewModel 是 LinModel ,我们里面有了 AModel 和BModel。
我们定义一个 Attribute ,让每个 ViewModel 都使用我们定义的 Attribute ,于是我们知道了哪些就是 ViewModel 。我们不使用判断反射得到的 Class 是不是继承 ViewModelBase 的原因是有一些 ViewModel 我们是不放在 ViewModelLocater ,我们只标识我们要放在 ViewModelLocater 的ViewModel
    public class ViewModelLocaterAttribute : Attribute
    {

    }


    [ViewModelLocaterAttribute]
    public class AModel:ViewModelBase
    {
        public override void OnNavigatedFrom(object obj)
        {
            throw new NotImplementedException();
        }

        public override void OnNavigatedTo(object obj)
        {
            throw new NotImplementedException();
        }
    }

    public class APage : Page
    {

    }

    //不放在ViewModelLocater
    public class ListModel:ViewModelBase
    {
        public override void OnNavigatedFrom(object obj)
        {
            throw new NotImplementedException();
        }

        public override void OnNavigatedTo(object obj)
        {
            throw new NotImplementedException();
        }
    }

    public class ViewModelLocater:ViewModelBase
    {
        public ViewModelLocater()
        {
            var applacationAssembly = Application.Current.GetType().GetTypeInfo().Assembly;
            foreach (var temp in applacationAssembly.DefinedTypes
             .Where(temp => temp.CustomAttributes.Any(t => t.AttributeType == typeof(LinModelAttribute))))
            {
                var viewmodel = temp.AsType().GetConstructor(Type.EmptyTypes).Invoke(null);
                Type page=null;
                try
                {
                    page= applacationAssembly.DefinedTypes.First(t => t.Name.Replace("Page", "") == temp.Name.Replace("Model", "")).AsType();
                }
                catch
                {
                    //InvalidOperationException
                    //提醒没有page
                    //throw new Exception("没有"+temp.Name.Replace("Model","")+"Page");
                }

                ViewModel.Add(new ViewModelPage()
                {
                    ViewModel = viewmodel as ViewModelBase,
                    Page = page
                });
            }
        }

        public override void OnNavigatedFrom(object obj)
        {

        }

        public override void OnNavigatedTo(object obj)
        {
        }
    }
关于反射,戳此链接 http://lindexi.oschina.io/lindexi/post/win10-uwp-%E5%8F%8D%E5%B0%84/
自己的框架
我们开始说如何做一个自己的框架。
在上面使用绑定的方法,我们可以看到,我们需要一个类来存放 page 和 ViewModel ,我们的 ViewModel 之间的通信比较难做,于是我们为了让开发简单,我们做一个简单的 ViewModel ,这个是核心,在程序运行就存在一个。
我们写一个类,这个类是保存 ViewModel 和View
这个类有Type Page页面,ViewModelBase ViewModel,如果我们有多个页使用相同 ViewModel ,我们需要使用 key 分开相同的ViewModel
我们这个类就需要下面很少的属性
       public string Key
        {
            set;
            get;
        }


        public ViewModelBase ViewModel
        {
            set;
            get;
        }

        public Type Page
        {
            set;
            get;
        }
但是大家也看到,这个需要在使用前就实现 ViewModel ,如果我们想要在使用 ViewModel 才实现,那么我们需要Type _viewModel,从 type 进行构造可以去看我之前的博客 win10 uwp 从Type使用构造
我们在这个类写方法 Navigate 判断 ViewModel 是否实现,如果没有,那么从 type 进行构造。
如果我们是在测试,没有 UI ,那么我们不跳转 Page ,请看代码
        public async Task Navigate(Frame content, object paramter)
        {
            if (ViewModel == null)
            {
                ViewModel = (ViewModelBase) _viewModel.GetConstructor(Type.EmptyTypes).Invoke(null);
            }
            ViewModel.OnNavigatedTo(paramter);
# if NOGUI
            return;
# endif
            await CoreApplication.MainView.CoreWindow.Dispatcher.RunAsync(CoreDispatcherPriority.Normal,
                () =>
                {
                    content.Navigate(Page);
                });
        }
我们在测试是没有 UI ,我们就不跳转。但是使用跳转可以是在后台,所以需要await CoreApplication.MainView.CoreWindow.Dispatcher.RunAsync(CoreDispatcherPriority.Normal,他可以让后台线程访问UI。
我们这个类需要ViewModelBase viewModel, Type page输入
        public ViewModelPage(Type viewModel, Type page)
        {
            _viewModel = viewModel;
            Page = page;
        }
或
        public ViewModelPage(Type viewModel, Type page,string key=null)
        {
            _viewModel = viewModel;
            Page = page;
        }
然后我们需要让 ViewModel 继承的类,他可以很简单,但是基本的几个功能可以跳转、可以被跳转、可以通信的功能还是写在他这里。
public abstract class ViewModelBase
{

}
我们基本的 ViewModel 需要在属性更改通知,我之前写了一个类 https://github.com/lindexi/UWP/blob/master/uwp/src/ViewModel/NotifyProperty.cs
我们需要继承这个,除了这个之外,原来跳转页面的参数是写在Page的 OnNavigatedTo ,但我们想让 ViewModel 知道我们跳转,我们的 ViewModel 通信需要INavigable
    public interface INavigable
    {
        /// <summary>
        ///     不使用这个页面
        ///     清理页面
        /// </summary>
        /// <param name="obj"></param>
        void OnNavigatedFrom(object obj);

        /// <summary>
        ///     跳转到
        /// </summary>
        /// <param name="obj"></param>
        void OnNavigatedTo(object obj);
    }
所有的 ViewModel 继承这个,为何让 ViewModel 继承他,是因为我们不想每次离开、使用都new 一个,我们使用的是一个,一旦我们不使用这个页面,使用 From ,这样让页面清理。可以提高我们的使用,在 MasterDetail ,总是切换页面,可以不需要实现那么多的 ViewModel 。我们还可以使用他来保存我们当前的使用,我们所输入,但是一旦输入多了,这个并不是很好用,主要看你是需要什么。
如果我们的 ViewModel 有页面,可以跳转,我们要继承
    public interface INavigato
    {
        Frame Content
        {
            set;
            get;
        }

        void Navigateto(Type viewModel, object parameter);
    }
Content 就是 ViewModel 可以跳转页面,我们的 Navigateto 提供 viewmodel 的 type 或 key ,输入参数。这是在一个页面里可以有跳转使用,假如我们使用的页面是一个 MasterDetail ,我们就需要两个页面,一个是列表,一个是内容,于是我们就可以使用他来跳转。
我们在 ViewModelBase 把 ViewModel 包含的页面 ViewModel 数组
        public List<ViewModelPage> ViewModel
        {
            set;
            get;
        } = new List<ViewModelPage>();
如果我们的页面 LinModel 存在多个可以跳转的页面 AModel 、 BModel ,我们就把他放进base. ViewModel ,需要跳转,就遍历 ViewModel ,拿出和输入相同 type 、 key 的 ViewModel ,使用他的跳转,因为我们把 ViewModel 和 View 都放一个类,我们直接使用类的跳转就好。
    public abstract class ViewModelBase : NotifyProperty, INavigable, INavigato
    {
        public List<ViewModelPage> ViewModel
        {
            set;
            get;
        } = new List<ViewModelPage>();

        public Frame Content
        {
            set;
            get;
        }

        public abstract void OnNavigatedFrom(object obj);
        public abstract void OnNavigatedTo(object obj);

        public async void Navigateto(Type viewModel, object paramter)
        {
            _viewModel?.OnNavigatedFrom(null);
            ViewModelPage view = ViewModel.Find(temp => temp.ViewModel.GetType() == viewModel);
            await view.Navigate(Content, paramter);
            _viewModel = view.ViewModel;
        }

        //当前ViewModel
        private ViewModelBase _viewModel;
    }
我们这样写如何绑定,我们可以通过跳转页面传入 ViewModel ,我们需要在 ViewModelPage 的 Navigate ,传入对应的ViewModel
            await CoreApplication.MainView.CoreWindow.Dispatcher.RunAsync(CoreDispatcherPriority.Normal,
                () =>
                {
                    content.Navigate(Page,ViewModel);
                });
然后在页面OnNavigatedTo的参数拿ViewModel,注意下面用的转换,如果参数不是LinModel就好出异常,一般我们拿的参数都是使用as。下面例子是故意这样写,在符合我们的规范,是不会存在炸了的情况。
        protected override void OnNavigatedTo(NavigationEventArgs e)
        {
            base.OnNavigatedTo(e);
            ViewModel = (LinModel) e.Parameter;
        }
这时,我们需要 DataContent 就写在 ViewModel 的后面
好啦,我把这个做出模板,大家可以去下载 http://download.csdn.net/detail/lindexi_gd/9716003
上面的模板适合于只有一个主界面,然后其他页面都是没有跳转。那么我们可以做一个静态的 ViewModel ,其他页面都直接从 ViewModel 中拿。
假如我们有个页面 APage , AModel ,那么把 AModel 写在ViewModel
我们可以使用在xaml DataContent 绑定拿到,于是xaml. cs 也简单可以拿到
<Page
    x:Class="Framework.View.APage"
    xmlns="http://schemas.microsoft.com/winfx/2006/xaml/presentation"
    xmlns:x="http://schemas.microsoft.com/winfx/2006/xaml"
    xmlns:local="using:Framework.View"
    xmlns:d="http://schemas.microsoft.com/expression/blend/2008"
    xmlns:mc="http://schemas.openxmlformats.org/markup-compatibility/2006"
    DataContext="{Binding Source={StaticResource ViewModel},Path=AModel}"
    mc:Ignorable="d">


        public APage()
        {
            this.InitializeComponent();
            ViewModel = (AModel) DataContext;
        }

        private AModel ViewModel
        {
            get;
        }
每个页面直接通信都是主页面传进来,而页面直接是没有通信,只有一个主页面,主页面可以跳转多个页面。
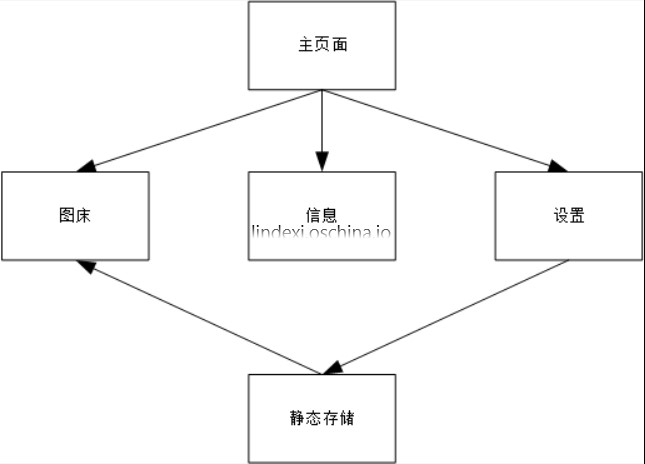
这是简单的汉堡。在我的应用,图床 https://www.microsoft.com/store/apps/9nblggh562r2 用到

开始是进入主页面,主页面有图床、信息、设置三个页面,于是这个三个页面都在主页面,而这三个页面都没有跳转页面,所以他们可以从 MainViewModel 拿到自己的 ViewModel 。他们的通信都是跳转主页面传给他们,三个页面没有传输信息。对于设置页面,我们是放在一个存储数据类,所以我们不需要传参数,直接从存储拿。
但是这个还是没解决在一个 ViewModel 里面,存在多个 ViewModel 之间的通信。
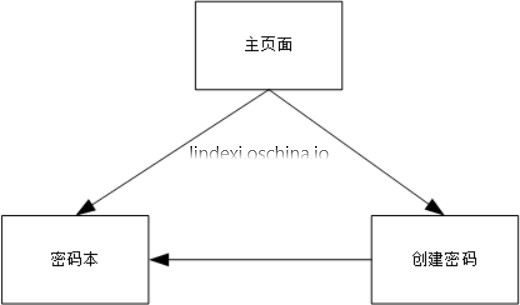
在我的私密密码本 https://www.microsoft.com/store/apps/9nblggh5cc3g
我的创建密码页面需要和密码本联系,在创建密码创建一个密码,就把密码放到密码本
所以我们上面的不能做到,我们需要添加一些新的。我们不可以让两个页面直接联系,我们需要让一个页面和他的上层联系,让上层发给他要联系页面。
关于这个是如何做,大家可以看下面的 MasterDetail ,这个我放在后面,后面的才是好的。
MasterDetail
我们用我们上面写的来做一个 MasterDetail ,我之前做了一个 win10 uwp 简单MasterDetail
我们需要做的:如何让两个页面通信

我们的 B 页面要和A通信,我们让B发送信息到上一级页面,由上一级页面传给A。
我们需要一个信息,他是有发送者,目标、发送内容,发送了什么
    public class Message
    {
        public Message()
        {

        }
        /// <summary>
        /// 发送者
        /// </summary>
        public ViewModelBase Source
        {
            set;
            get;
        }
        /// <summary>
        /// 目标
        /// </summary>
        public string Goal
        {
            set;
            get;
        }

        public object Content
        {
            set;
            get;
        }
        /// <summary>
        /// 发送什么信息
        /// </summary>
        public string Key
        {
            set;
            get;
        }
    }
我们还需要 ISendMessage 、IReceiveMessage
到时我们的 MasterModel 就会有一个 ISendMessage 属性,我们会在 DetailMasterModel 中给他,当然我们总是把 DetailMasterModel 作为属性,所以我们可能在使用他的类给 MasterModel 的 ISendMessage 一个值,这个就是 IOC 。
这样做的原因,可以去看:http://blog.csdn.net/linux7985/article/details/44782623
我们来写这两个,很简单
    interface ISendMessage
    {
        void SendMessage(Message message);
    }

    interface IReceiveMessage
    {
        void ReceiveMessage(Message message);
    }
我们使用的发送具体的是使用 Master 的,所以我们写MasterSendMessage
    public class MasterSendMessage : ISendMessage
    {
        public MasterSendMessage(Action<Message> sendMessage)
        {
            _sendMessage = sendMessage;
        }

        public void SendMessage(Message message)
        {
            _sendMessage?.Invoke(message);
        }
        private Action<Message> _sendMessage;
    }
到时我们在 DetailMaster 中实现 MasterSendMessage 传给MasterModel
我们以我的密码本来说,我们有一个是左边是一列密码,右边点击是显示内容。
那么我们是使用一个 ListModel 和 ContentModel ,我们的数据是
    public class KeySecret : NotifyProperty
    {
        public KeySecret()
        {

        }

        public string Name
        {
            set
            {
                _name = value;
                OnPropertyChanged();
            }
            get
            {
                return _name;
            }
        }

        public string Key
        {
            set
            {
                _key = value;
                OnPropertyChanged();
            }
            get
            {
                return _key;
            }
        }


        private string _key;

        private string _name;
    }
在 ListModel 有一个ObservableCollection<KeySecret> KeySecret
        public ObservableCollection<KeySecret> KeySecret
        {
            set
            {
                _keySecret = value;
                OnPropertyChanged();
            }
            get
            {
                return _keySecret;
            }
        }

        public ISendMessage SendMessage
        {
            set;
            get;
        }
在 ContentModel 有一个public KeySecret Key和接收。
CodeStorageModel 有 DetailMaster 、ContentModel ListModel
其中 DetailMaster 控制界面,他的功能大家可以直接复制到自己的项目,不过还需要复制 MasterDetailPage ,复制好了,那么需要修改的是<Frame x:Name="List" SourcePageType="local:ListPage"></Frame> <Frame x:Name="Content" SourcePageType="local:ContentPage"></Frame>把一个换为自己的列表页,一个换为详情。如何使用,我会在后面说。
在 CodeStorageModel 跳转需要设置 ListModel 跳转,我们一开始就显示,于是他也要,我们需要把 MasterSendMessage 实现,给 list ,这样就是一个 IOC 。
            DetailMaster.Narrow();
            MasterSendMessage temp=new MasterSendMessage(ReceiveMessage);
            ListModel = new ListModel()
            {
                SendMessage = temp
            };
            ListModel.OnNavigatedTo(null);
            ContentModel = new ContentModel();
大神说除了 foreach ,不能使用 temp ,我这时也用了 temp ,是想告诉大家不要在使用。
这样我们需要在 CodeStorageModel 写一个接收,还记得 DetailMasterModel 在点击需要使用函数,我们接收有时有很多,我们需要判断他的key,如果是”点击列表”,那么我们需要布局显示。
        public void ReceiveMessage(Message message)
        {
            if (message.Key == "点击列表")
            {
                DetailMaster.MasterClick();

            }
            if (message.Goal == nameof(ContentModel))
            {
                ContentModel.ReceiveMessage(message);
            }
        }
ContentModel.ReceiveMessage 可以把 key 改为点击列表
        public void ReceiveMessage(Message message)
        {
            if (message.Key == "点击列表")
            {
                Key=message.Content as KeySecret;
            }
        }
我们界面就不说了,直接去 https://github.com/lindexi/UWP/tree/cd1637bf31eb22a230390c205da93f840070c49d/uwp/src/Framework/Framework
我要讲下修改,我们发现我们现在写的两个页面通信在 MasterDetail 有用,但是要确定我们的页面,这样不好,在上面我们说可以加功能不需要去修改写好的,我们需要做的是接收信息,不使用上面的。
大家去看代码注意我是在新的 master 代码和现在的不同,注意链接
如何使用我的 MasterDetail 框架,我下面和大家说。
首先是复制DetailMasterMode,关于这个是如何写,我在之前的博客有说,如果希望知道如何制作一个DetailMaster,戳此链接
    public class DetailMasterModel : NotifyProperty
    {
        public DetailMasterModel()
        {
            SystemNavigationManager.GetForCurrentView().BackRequested += BackRequested;
            Narrow();
        }

        public int GridInt
        {
            set
            {
                _gridInt = value;
                OnPropertyChanged();
            }
            get
            {
                return _gridInt;
            }
        }

        public int ZFrame
        {
            set
            {
                _zFrame = value;
                OnPropertyChanged();
            }
            get
            {
                return _zFrame;
            }
        }

        public GridLength MasterGrid
        {
            set
            {
                _masterGrid = value;
                OnPropertyChanged();
            }
            get
            {
                return _masterGrid;
            }
        }

        public GridLength DetailGrid
        {
            set
            {
                _detailGrid = value;
                OnPropertyChanged();
            }
            get
            {
                return _detailGrid;
            }
        }

        public int ZListView
        {
            set
            {
                _zListView = value;
                OnPropertyChanged();
            }
            get
            {
                return _zListView;
            }
        }

        public bool HasFrame
        {
            set;
            get;
        }

        public Visibility Visibility
        {
            set
            {
                _visibility = value;
                OnPropertyChanged();
            }
            get
            {
                return _visibility;
            }
        }

        public void MasterClick()
        {
            HasFrame = true;
            Visibility = Visibility.Visible;
            Narrow();
        }

        public void Narrow()
        {
            if (Window.Current.Bounds.Width < 720)
            {
                MasterGrid = new GridLength(1, GridUnitType.Star);
                DetailGrid = GridLength.Auto;
                GridInt = 0;
                if (HasFrame)
                {
                    ZListView = 0;
                }
                else
                {
                    ZListView = 2;
                }
            }
            else
            {
                MasterGrid = GridLength.Auto;
                DetailGrid = new GridLength(1, GridUnitType.Star);
                GridInt = 1;
            }
        }

        private GridLength _detailGrid;

        private int _gridInt;

        private GridLength _masterGrid;

        private Visibility _visibility = Visibility.Collapsed;

        private int _zFrame;

        private int _zListView;

        private void BackRequested(object sender, BackRequestedEventArgs e)
        {
            HasFrame = false;
            Visibility = Visibility.Collapsed;
            Narrow();
        }
    }
然后把它放到 ViewModel
        public DetailMasterModel DetailMaster
        {
            set;
            get;
        }
在 ViewModel 构造使用DetailMaster.Narrow();还有标题栏AppViewBackButtonVisibility
            DetailMaster = new DetailMasterModel();
            SystemNavigationManager.GetForCurrentView().AppViewBackButtonVisibility =
                AppViewBackButtonVisibility.Visible;
            DetailMaster.Narrow();
然后在界面复制下面代码,同样是我之前文章讲到的,感兴趣请去看:win10 uwp 简单MasterDetail
<Grid Background="{ThemeResource ApplicationPageBackgroundThemeBrush}">
<VisualStateManager.VisualStateGroups >
<VisualStateGroup CurrentStateChanged="{x:Bind View.DetailMaster.Narrow}">
<VisualState>
<VisualState.StateTriggers>
<AdaptiveTrigger MinWindowWidth="720"/>
</VisualState.StateTriggers>
<VisualState.Setters >
<!--<Setter Target="Img.Visibility" Value="Collapsed"></Setter>-->
</VisualState.Setters>
</VisualState>
<VisualState>
<VisualState.StateTriggers>
<AdaptiveTrigger MinWindowHeight="200">
</AdaptiveTrigger>
</VisualState.StateTriggers>
<VisualState.Setters >
</VisualState.Setters>
</VisualState>
</VisualStateGroup>
</VisualStateManager.VisualStateGroups>
<Grid>
<Grid.ColumnDefinitions>
<ColumnDefinition Width="{x:Bind View.DetailMaster.MasterGrid,Mode=OneWay}"></ColumnDefinition>
<ColumnDefinition Width="{x:Bind View.DetailMaster.DetailGrid,Mode=OneWay}"></ColumnDefinition>
</Grid.ColumnDefinitions>
<Grid Background="{ThemeResource ApplicationPageBackgroundThemeBrush}"
Canvas.ZIndex="{x:Bind View.DetailMaster.ZListView,Mode=OneWay}">
<!--<Grid Background="Black"></Grid>-->
<TextBlock Text="List" HorizontalAlignment="Center"></TextBlock>
<Frame x:Name="List" SourcePageType="local:ListPage"></Frame>
</Grid>
<Grid Grid.Column="{x:Bind View.DetailMaster.GridInt,Mode=OneWay}" Background="{ThemeResource ApplicationPageBackgroundThemeBrush}"
Canvas.ZIndex="{x:Bind View.DetailMaster.ZFrame}">
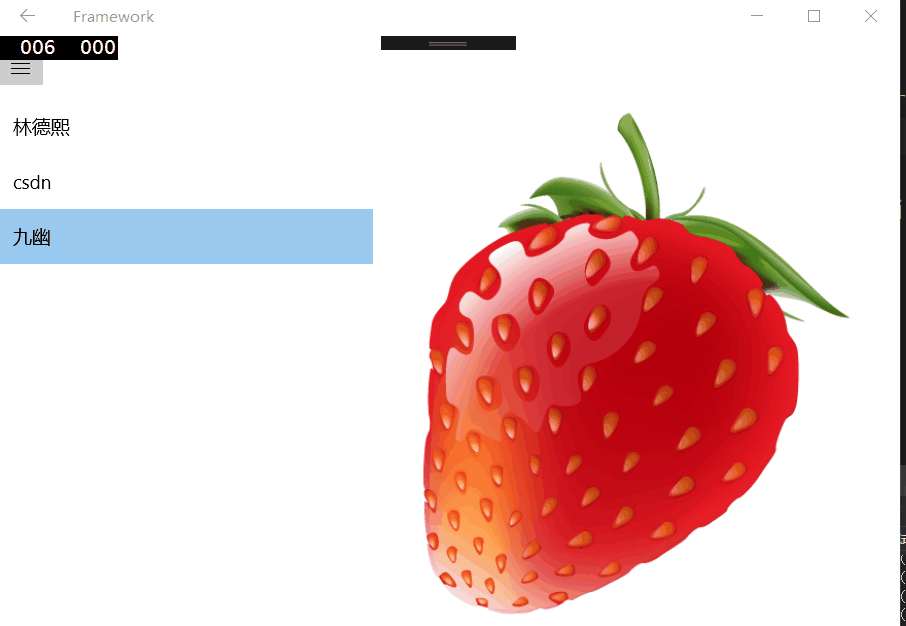
<Image Source="ms-appx:///Assets/Strawberry_Adult_content_easyicon.net.png"></Image>
<Grid Background="{ThemeResource ApplicationPageBackgroundThemeBrush}" Visibility="{x:Bind View.DetailMaster.Visibility,Mode=OneWay}">
<TextBlock Text="content" HorizontalAlignment="Center"></TextBlock>
<!--<Grid Background="#FF565500"></Grid>-->
<Frame x:Name="Content" SourcePageType="local:ContentPage"></Frame>
</Grid>
</Grid>
</Grid>
</Grid>
注意把<Frame x:Name="List" SourcePageType="local:ListPage"></Frame>换为列表页面,和<Frame x:Name="Content" SourcePageType="local:ContentPage"></Frame>换为内容, <Image Source="ms-appx:///Assets/Strawberry_Adult_content_easyicon.net.png"></Image>换为自己的图片
需要在xaml.cs写 ViewModel 为 view ,如果不是,那么自己换名。
页面的联系使用ISendMessage,和接收,他向 MasterDetailViewModel 发信息,让 ContentModel 接收。
我们需要和上面写的一样,传入 MasterSendMessage 给他,让他可以发送信息。
然后判断发送信息,发给内容,具体可以去看代码,如果有不懂请发邮件或在评论,这很简单
我们写 CodeStorageAttribute ,这个是我们一个页面,通过这个特性就可以找到对应的 ViewModel ,当然需要在对应的 ViewModel 添加这个特性。
    [AttributeUsage(AttributeTargets.Class, Inherited = false, AllowMultiple = true)]
    sealed class CodeStorageAttribute : Attribute
    {

    }
我们在 ListModel 和 ContentModel 写 CodeStorageAttribute 这样就可以通过反射的方式找到
然后我们可以在 CodeStorageModel 使用反射的方法添加对应的页面
           var applacationAssembly = Application.Current.GetType().GetTypeInfo().Assembly;
            foreach (var temp in applacationAssembly.DefinedTypes
                .Where(temp => temp.CustomAttributes.Any(t => t.AttributeType == typeof(CodeStorageAttribute))))
            {
                var viewmodel = temp.AsType().GetConstructor(Type.EmptyTypes).Invoke(null);
                Type page = null;
                try
                {
                    page =
                        applacationAssembly.DefinedTypes.First(
                            t => t.Name.Replace("Page", "") == temp.Name.Replace("Model", "")).AsType();
                }
                catch
                {
                    //InvalidOperationException
                    //提醒没有page
                    //throw new Exception("没有"+temp.Name.Replace("Model","")+"Page");
                }

                ViewModel.Add(new ViewModelPage( viewmodel as ViewModelBase,page));
            }
我修改 ISendMessage 添加一个事件
    public interface ISendMessage
    {
        EventHandler<Message> SendMessageHandler
        {
            set;
            get;
        }
    }
判断我们的 ViewModel 是不是 ISendMessage ,页面是先上一级发送,所以我们把 SendMessageHandler 添加
            foreach (var temp in ViewModel.Where(temp => temp.ViewModel is ISendMessage))
            {
                ((ISendMessage)temp.ViewModel).SendMessageHandler += (s, e) =>
               {
                   ReceiveMessage(e);
               };
            }
我们删除public ContentModel ContentModel public ListModel ListModel在 ListPage 和 Content ,我们直接使用索引。这样如果需要很多个页面就不需要添加很多个属性。
在 CodeStorageModel 添加了下面代码,这样可以通过 xaml 绑定传入字符串
        public ViewModelBase this[string str]
        {
            get
            {
                foreach (var temp in ViewModel)
                {
                    if (temp.Key == str)
                    {
                        return temp.ViewModel;
                    }
                }
                return null;
            }
        }
修改 ListPage 的 dateContent 为下面代码
DataContext="{Binding Source={StaticResource ViewModel},Path=CodeStorageModel[ListModel]}"
ContentPage 的 dateContent 用来绑定指定的 ContentModel ,绑定的方法是通过传入字符串的方式,请看代码
DataContext="{Binding Source={StaticResource ViewModel},Path=CodeStorageModel[ContentModel]}"
在 CodeStorageModel 的 OnNavigatedTo 方法添加下面代码
        public override void OnNavigatedTo(object obj)
        {
            DetailMaster.Narrow();
            foreach (var temp in ViewModel)
            {
                temp.ViewModel.OnNavigatedTo(null);
            }
        }
这样我们就不需要去写一个 ListModel 在我们写 CodeStorageModel ,我们也不知道哪个页面会发送,不知哪个页面接收,我们直接在接收看信息发送的哪个,找出,使用他的接收
        public void ReceiveMessage(Message message)
        {
            if (message.Key == "点击列表")
            {
                DetailMaster.MasterClick();
            }
            foreach (var temp in ViewModel)
            {
                if (temp.Key == message.Goal)
                {
                    var receive = temp.ViewModel as IReceiveMessage;
                    receive?.ReceiveMessage(message);
                }
            }
        }
通过这个方法可以做到页面之间没有耦合,使用约定的方式连接多个页面。
全部源代码
https://github.com/lindexi/UWP/tree/master/uwp/src/Framework/Framework
不想每次都自己写很多类,可以下载我的模板 http://download.csdn.net/detail/lindexi_gd/9716003
下载后放在 C:\Program Files (x86)\Microsoft Visual Studio 14.0\Common7\IDE\ProjectTemplates\CSharp\Windows Root\Windows UAP 的 文件夹里,参见 http://lindexi.oschina.io/lindexi/post/Visual-Studio-%E8%87%AA%E5%AE%9A%E4%B9%89%E9%A1%B9%E7%9B%AE%E6%A8%A1%E6%9D%BF/
然后执行devenv /setup
我们就可以在新建项目使用模板
课件:https://r302.cc/B96jVQ
参考: http://www.ruanyifeng.com/blog/2015/02/mvcmvp_mvvm.html
关于 MVC 和 MVVM 区别,参见:http://www.cnblogs.com/indream/p/3602348.html
本文会经常更新,请阅读原文: https://blog.lindexi.com/post/win10-uwp-MVVM%E5%85%A5%E9%97%A8.html ,以避免陈旧错误知识的误导,同时有更好的阅读体验。
如果你想持续阅读我的最新博客,请点击 RSS 订阅,推荐使用RSS Stalker订阅博客,或者收藏我的博客导航
 本作品采用
知识共享署名-非商业性使用-相同方式共享 4.0 国际许可协议
进行许可。欢迎转载、使用、重新发布,但务必保留文章署名林德熙(包含链接:
https://blog.lindexi.com
),不得用于商业目的,基于本文修改后的作品务必以相同的许可发布。如有任何疑问,请
与我联系
。
本作品采用
知识共享署名-非商业性使用-相同方式共享 4.0 国际许可协议
进行许可。欢迎转载、使用、重新发布,但务必保留文章署名林德熙(包含链接:
https://blog.lindexi.com
),不得用于商业目的,基于本文修改后的作品务必以相同的许可发布。如有任何疑问,请
与我联系
。

无盈利,不卖课,做纯粹的技术博客
以下是广告时间
推荐关注 Edi.Wang 的公众号

欢迎进入 Eleven 老师组建的 .NET 社区

以上广告全是友情推广,无盈利