很多开发者,包括开发老司机们,在碰到需要调用 Win32 函数时,都有一个困扰,那就是我应该如何去调用。有两个主要的选项,第一就是自己写 PInvoke 代码,第二就是使用其他大佬给许多 Win32 函数封装好的库。然而这两个方法都有各有各的缺点,第一个方法缺点是可能工作量会很大,需要写方法,写结构体等等。第二个方法缺点是大佬封装的库,虽然全,但可惜里面有很多我用不着的函数,有些浪费。本文将来和大家介绍一个宝藏库,可以很好解决此问题
这是由微软官方发布的库,基于 SourceGenerator 源代码生成技术实现的库。核心原理和工作方式就是,通过源代码生成的方法,生成你项目所需的 Win32 函数。自动生成的 Win32 函数调用封装,可以省去很多开发成本。尽管对于一些特殊一点的 Win32 函数,默认的自动实现也许带坑,但是对于极大多数情况来说,自动生成的都是挺好的,至少好过自己随便去网上抄的代码。由于只生成项目所使用到的 Win32 函数的 PInvoke 代码,此库可以做到极少的代码浪费。相对比引用其他大佬对 Win32 函数进行封装的库来说,使用 CsWin32 库的优点在于可以不需要多依赖程序集,不需要多依赖程序集可以提升应用启动性能,且 CsWin32 只包含项目所需的 Win32 函数的 PInvoke 代码,生成的体积更小
下面来让我介绍一下 CsWin32 库的使用方法
这是一个使用 SourceGenerator 源代码生成技术,生成对 Win32 函数的 PInvoke 封装的库,也就是说这个库是没有最终需要发布的 DLL 的存在的,而是将 Win32 函数的 PInvoke 封装写入到自己的项目里面。按照惯例,使用的第一步就是通过 NuGet 包进行安装。对于 SDK 风格的 csproj 项目文件格式来说,可以编辑 csproj 项目文件,添加以下代码用来安装 Microsoft.Windows.CsWin32 库
  <ItemGroup>
    <PackageReference Include="Microsoft.Windows.CsWin32" PrivateAssets="all" Version="0.2.63-beta" />
  </ItemGroup>
添加之后的 csproj 项目文件的代码大概如下
<Project Sdk="Microsoft.NET.Sdk">

  <PropertyGroup>
    <OutputType>Exe</OutputType>
    <TargetFramework>net6.0</TargetFramework>
    <ImplicitUsings>enable</ImplicitUsings>
    <Nullable>enable</Nullable>
  </PropertyGroup>
  <ItemGroup>
    <PackageReference Include="Microsoft.Windows.CsWin32" PrivateAssets="all" Version="0.2.63-beta" />
  </ItemGroup>
</Project>
此 Microsoft.Windows.CsWin32 当前最低支持到 .NET Framework 4.5 的版本。有一些旧的项目,采用的 csproj 项目文件格式还不是 SDK 风格的,推荐先改造此 csproj 文件,修改为 SDK 风格的。修改为 SDK 风格的 csproj 能有更好的可读性,而且可以减少多人协作时,编辑 csproj 带来的冲突。如何从旧的项目格式文件升级到 SDK 风格的,其实只需要两句命令行,请参阅 从以前的项目格式迁移到 VS2017 新项目格式
这里需要敲一下黑板,此 Microsoft.Windows.CsWin32 库使用到 SourceGenerator 技术,要求采用 VisualStudio 2022 较新版本才能支持。是 VisualStudio 2022 较新版本,不仅仅是 VisualStudio 2022 哦。如果你的 VisualStudio 2022 的版本比较落后了,那这个库使用的时候,也许会提示很多诡异的错误,比如找不到方法,或者是构建找到重复的文件
安装完成之后,就可以开始编写代码了。如上文说的,这个 Microsoft.Windows.CsWin32 库是只生成项目所需要的 Win32 函数的 PInvoke 封装,那么咱需要解决一个问题,如何让 Microsoft.Windows.CsWin32 库知道咱项目里需要哪些 Win32 函数
做法就是新建一个叫 NativeMethods.txt 的文件,将此文件放入到项目的根路径里面,也就是不要将这个文件藏在项目的其他文件夹里面。如果依然不知道怎么放,那就到本文末尾获取本文的源代码,看看例子
在 NativeMethods.txt 文件里面,一行一个 Win32 方法名,只需要写入方法名,就会自动生成对此方法的封装
下面是在 NativeMethods.txt 文件写的例子
GetModuleHandle
RegisterWaitUntilOOBECompleted
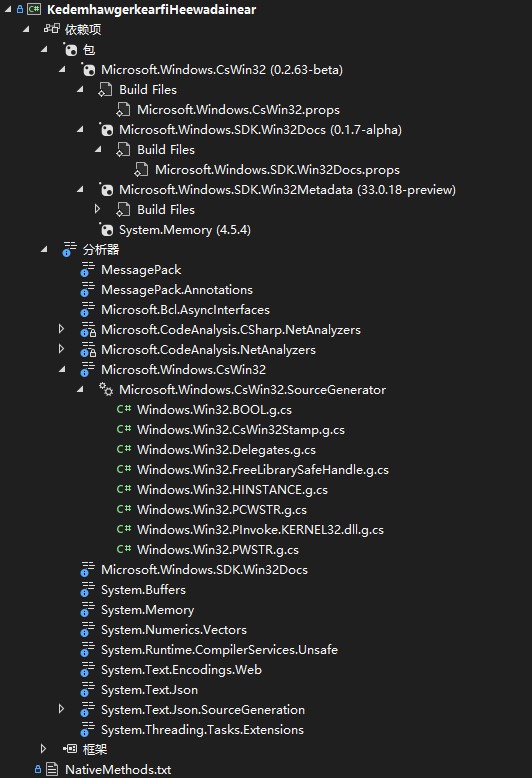
我写上了两个函数名,然后交给 Microsoft.Windows.CsWin32 生成这两个 Win32 函数的封装,以及这两个 Win32 函数用到的参数类型,和一些辅助代码,如下图

生成的代码都是可以直接调用的
来看看其中的 Windows.Win32.PInvoke.KERNEL32.dll.g.cs 文件里对 GetModuleHandle 方法的生成代码
		/// <inheritdoc cref="GetModuleHandle(winmdroot.Foundation.PCWSTR)"/>
		[SupportedOSPlatform("windows5.1.2600")]
		internal static unsafe FreeLibrarySafeHandle GetModuleHandle(string lpModuleName)
		{
			fixed (char* lpModuleNameLocal = lpModuleName)
			{
				winmdroot.Foundation.HINSTANCE __result = PInvoke.GetModuleHandle(lpModuleNameLocal);
				return new FreeLibrarySafeHandle(__result, ownsHandle: false);
			}
		}

		/// <summary>Retrieves a module handle for the specified module. The module must have been loaded by the calling process.</summary>
		/// <param name="lpModuleName">
		/// <para>The name of the loaded module (either a .dll or .exe file). If the file name extension is omitted, the default library extension .dll is appended. The file name string can include a trailing point character (.) to indicate that the module name has no extension. The string does not have to specify a path. When specifying a path, be sure to use backslashes (\\), not forward slashes (/). The name is compared (case independently) to the names of modules currently mapped into the address space of the calling process.</para>
		/// <para>If this parameter is NULL, <b>GetModuleHandle</b> returns a handle to the file used to create the calling process (.exe file). The <b>GetModuleHandle</b> function does not retrieve handles for modules that were loaded using the <b>LOAD_LIBRARY_AS_DATAFILE</b> flag. For more information, see <a href="https://docs.microsoft.com/windows/desktop/api/libloaderapi/nf-libloaderapi-loadlibraryexa">LoadLibraryEx</a>.</para>
		/// <para><see href="https://docs.microsoft.com/windows/win32/api//libloaderapi/nf-libloaderapi-getmodulehandlew#parameters">Read more on docs.microsoft.com</see>.</para>
		/// </param>
		/// <returns>
		/// <para>If the function succeeds, the return value is a handle to the specified module. If the function fails, the return value is NULL. To get extended error information, call <a href="/windows/desktop/api/errhandlingapi/nf-errhandlingapi-getlasterror">GetLastError</a>.</para>
		/// </returns>
		/// <remarks>
		/// <para><see href="https://docs.microsoft.com/windows/win32/api//libloaderapi/nf-libloaderapi-getmodulehandlew">Learn more about this API from docs.microsoft.com</see>.</para>
		/// </remarks>
		[DllImport("KERNEL32.dll", ExactSpelling = true, EntryPoint = "GetModuleHandleW", SetLastError = true)]
		[DefaultDllImportSearchPaths(DllImportSearchPath.System32)]
		[SupportedOSPlatform("windows5.1.2600")]
		internal static extern winmdroot.Foundation.HINSTANCE GetModuleHandle(winmdroot.Foundation.PCWSTR lpModuleName);
可以看到生成的 Win32 函数的封装的代码的质量还是不错的,写的十分标准,包含了入口点,和对字符串的处理,加上设置 LastError 和 DLL 寻找地方以及对应的系统版本,更重要的是还能自动拷贝注释过来
可以通过如下方式获取本文的源代码,先创建一个空文件夹,接着使用命令行 cd 命令进入此空文件夹,在命令行里面输入以下代码,即可获取到本文的代码
git init
git remote add origin https://gitee.com/lindexi/lindexi_gd.git
git pull origin ce7ae7a347546b8234bfa7da5d30b284366a7656
以上使用的是 gitee 的源,如果 gitee 不能访问,请替换为 github 的源。请在命令行继续输入以下代码
git remote remove origin
git remote add origin https://github.com/lindexi/lindexi_gd.git
git pull origin ce7ae7a347546b8234bfa7da5d30b284366a7656
获取代码之后,进入 KedemhawgerkearfiHeewadainear 文件夹
更多编译器、代码分析、代码生成相关博客,请参阅我的 博客导航
本文会经常更新,请阅读原文: https://blog.lindexi.com/post/dotnet-%E4%BD%BF%E7%94%A8-CsWin32-%E5%BA%93%E7%AE%80%E5%8C%96-Win32-%E5%87%BD%E6%95%B0%E8%B0%83%E7%94%A8%E9%80%BB%E8%BE%91.html ,以避免陈旧错误知识的误导,同时有更好的阅读体验。
如果你想持续阅读我的最新博客,请点击 RSS 订阅,推荐使用RSS Stalker订阅博客,或者收藏我的博客导航
 本作品采用
知识共享署名-非商业性使用-相同方式共享 4.0 国际许可协议
进行许可。欢迎转载、使用、重新发布,但务必保留文章署名林德熙(包含链接:
https://blog.lindexi.com
),不得用于商业目的,基于本文修改后的作品务必以相同的许可发布。如有任何疑问,请
与我联系
。
无盈利,不卖课,做纯粹的技术博客
以下是广告时间
推荐关注 Edi.Wang 的公众号

欢迎进入 Eleven 老师组建的 .NET 社区

以上广告全是友情推广,无盈利

