在 WPF 开源代码里面,可以看到是从各个项目的 Strings.resx 和对应的 xlf 文件,生成对应项目的多语言程序集。这里的多语言程序集可用于抛出异常时,给出本地化的消息提示
在 dotnet 庞大的生态集里,打包工具链是开源中很重要的部分工作。通过 https://github.com/dotnet/arcade 将打包中重复的工作放在一个仓库中,减少基础设施能力在多个项目中重复进行。就像我所在的团队开源的 DotNETBuildSDK 项目一样,提供各种构建工具用在各个项目里面
翻遍整个 WPF 仓库,都无法直接找到任何的从 Strings.resx 和对应的 xlf 文件生成多语言卫星程序集的逻辑。这是因为多语言的核心转换是放在 Microsoft.DotNet.Arcade.Sdk 里面,在 WPF 仓库里面只有一些配置项
整个 WPF 开源仓库的组织是相对清晰的,所有和构建相关的配置都放在 eng 文件夹里面。其中对 Microsoft.DotNet.Arcade.Sdk 的引用分别放在 eng\WpfArcadeSdk\Sdk\Sdk.props 和 eng\WpfArcadeSdk\Sdk\Sdk.targets 文件里。核心代码只有以下这两句
  <!-- Importing Arcade's Sdk.props should always be the first thing we do. However this is not a hard rule,
       it's just a convention for ensuring correctness and consistency in our build environment. If anything
       does need to be imported before, it should be documented why it is needed. -->
  <Import Project="Sdk.props" Sdk="Microsoft.DotNet.Arcade.Sdk" />

  <Import Project="Sdk.targets" Sdk="Microsoft.DotNet.Arcade.Sdk" />
多语言配置部分的逻辑放在 eng\WpfArcadeSdk\tools\SystemResources.props 文件里,其代码较多,咱就先不展开细看
从 WPF 代码仓库里面是没有看到详尽的多语言转换过程逻辑的,但看了这几个文件也够咱自己学习模仿 WPF 用 Microsoft.DotNet.Arcade.Sdk 处理代码里的多语言的方式。接下来我将新建一个 WPF 空项目,在此和大家演示使用 Microsoft.DotNet.Arcade.Sdk 处理多语言,相信大家能够学会用此构建工具生成多语言程序集
新建一个空白的 WPF 项目
虽然按照 .NET 的惯例,使用一个库的第一件事就是用 NuGet 进行库的安装。但 Microsoft.DotNet.Arcade.Sdk 比较特殊,这是一个 SDK 而不是一个 Library 库。直接使用 NuGet 安装会报告以下错误
包“Microsoft.DotNet.Arcade.Sdk 11.0.0-beta.25556.1”具有一个包类型“MSBuildSdk”,项目“Xxxxx”不支持该类型。
正确的使用方法如下
第一步是添加 NuGet.config 文件,设置使用 dotnet-eng 源。因为 Microsoft.DotNet.Arcade.Sdk 库是没有放在公网 NuGet 源里面的。修改之后的 NuGet.config 文件内容如下
<?xml version="1.0" encoding="utf-8"?>
<configuration>
  <packageSources>
    <clear />
    <!--End: Package sources managed by Dependency Flow automation. Do not edit the sources above.-->
    <add key="dotnet-eng" value="https://pkgs.dev.azure.com/dnceng/public/_packaging/dotnet-eng/nuget/v3/index.json" />

  </packageSources>
</configuration>
第二步是添加 global.json 文件,设置 Microsoft.DotNet.Arcade.Sdk 的版本。这一步就类似于使用 NuGet 进行安装的过程,只不过用的是 SDK 的方式
{
  "msbuild-sdks":
  {
    "Microsoft.DotNet.Arcade.Sdk": "10.0.0-beta.25411.109"
  }
}
第三步就是在 csproj 项目文件里面添加引用,代码如下
  <Import Project="Sdk.props" Sdk="Microsoft.DotNet.Arcade.Sdk" />
  <Import Project="Sdk.targets" Sdk="Microsoft.DotNet.Arcade.Sdk" />
如此三步就可以完成 Microsoft.DotNet.Arcade.Sdk 库安装
完成安装之后,就可以尝试多语言的加入了。只需放入 resx 文件,无论命名和放在哪个文件夹内。为了简单起见,我随便从 WPF 仓库拷贝了一个 Strings.resx 文件,编辑之后的内容如下
此时直接构建肯定是没有效果的,因为还没有设置 GenerateResxSource 属性为 true 值,用于配置让 Arcade 进行多语言生成
  <PropertyGroup>
    <GenerateResxSource>true</GenerateResxSource>
  </PropertyGroup>
再设置 EmbeddedResource 属性,配置好生成的类型的命名空间和类名,配置的代码如下
  <ItemDefinitionGroup>
    <EmbeddedResource>
      <GenerateSource>true</GenerateSource>
      <ManifestResourceName>FxResources.$(AssemblyName).SR</ManifestResourceName>
      <ClassName>MS.Utility.SR</ClassName>
    </EmbeddedResource>
  </ItemDefinitionGroup>
以上代码里面的 GenerateSource 设置为 true 表示当前项用来配置多语言的生成。以上代码的 ManifestResourceName 只是一个用来标识资源存在的程序集,用来执行 typeof 获取 ResourceManager 的资源,命名上比较随意。以上的 ClassName 为重点部分,用来表示从 resx 文件应该生成的类型全名,采用命名空间加类型名的表示法。如 MS.Utility.SR 将生成命名空间为 MS.Utility 且类型名为 SR 的类型
通过 ClassName 的配置,即可让各个程序集采用不同的命名空间配置。如在 WPF 仓库的 eng\WpfArcadeSdk\tools\SystemResources.props 文件里,就使用了以下类似的代码为各个程序集配置不同的命名空间
<ItemDefinitionGroup>
    <EmbeddedResource>
      <GenerateSource>true</GenerateSource>
      <ManifestResourceName>FxResources.$(AssemblyName).SR</ManifestResourceName>

      <ClassName Condition="'$(AssemblyName)'=='PresentationBuildTasks'">MS.Utility.SR</ClassName>
      <ClassName Condition="'$(AssemblyName)'=='UIAutomationTypes'">System.SR</ClassName>
      <ClassName Condition="'$(AssemblyName)'=='WindowsBase'">MS.Internal.WindowsBase.SR</ClassName>
      ...
      <ClassName Condition="'$(AssemblyName)'=='PresentationCore'">MS.Internal.PresentationCore.SR</ClassName>
      <ClassName Condition="'$(AssemblyName)'=='System.Xaml'">System.SR</ClassName>
      <Classname Condition="'%(ClassName)'==''">System.SR</Classname>
    </EmbeddedResource>
  </ItemDefinitionGroup>
以上逻辑就能够完成多语言生成的配置
然而现在还不能通过构建,一构建将提示类似如下的错误
C:\Users\lindexi\.nuget\packages\microsoft.dotnet.arcade.sdk\10.0.0-beta.25411.109\tools\Version.BeforeCommonTargets.targets(88,5): error MSB4184: 无法计算表达式“"".GetValue(1)”。Index was outside the bounds of the array.
这是因为在 Version.BeforeCommonTargets.targets 文件里面存在如下代码
  <PropertyGroup>
    <VersionPrefix Condition="'$(MajorVersion)' != '' and '$(MinorVersion)' != ''">$(MajorVersion).$(MinorVersion).$([MSBuild]::ValueOrDefault('$(PatchVersion)', '0'))</VersionPrefix>
  </PropertyGroup>

  <PropertyGroup Condition="'$(PreReleaseVersionLabel)' == ''">
    <_VersionPrefixMajor>$(VersionPrefix.Split('.')[0])</_VersionPrefixMajor>
    <_VersionPrefixMinor>$(VersionPrefix.Split('.')[1])</_VersionPrefixMinor>
    <VersionPrefix>$(_VersionPrefixMajor).$(_VersionPrefixMinor).$([MSBuild]::ValueOrDefault($(_PatchNumber), '0'))</VersionPrefix>
    <VersionSuffix/>
  </PropertyGroup>
尽管我认为这是 Microsoft.DotNet.Arcade.Sdk 库的设计不够开箱即用,但考虑到这是一个专用的库,这一点也能接受。继续编辑 csproj 项目文件,添加如下代码,添加版本号信息
  <PropertyGroup>
    <MajorVersion>1</MajorVersion>
    <MinorVersion>2</MinorVersion>
  </PropertyGroup>
如此即可完成构建准备,尝试构建一下。此时细心的伙伴也许就发现了,在 obj 文件夹下,生成了 obj\Debug\net9.0-windows\MS.Utility.SR.cs 文件,且在此文件里面填满了在 Strings.resx 资源字典定义的多语言项。其生成代码大概如下
using System.Reflection;
namespace FxResources.QewheefanallJabayhejage
{
internal static class SR { }
}
namespace MS.Utility
{
internal static partial class SR
{
private static global::System.Resources.ResourceManager s_resourceManager;
internal static global::System.Resources.ResourceManager ResourceManager => s_resourceManager ?? (s_resourceManager = new global::System.Resources.ResourceManager(typeof(FxResources.QewheefanallJabayhejage.SR)));
internal static global::System.Globalization.CultureInfo Culture { get; set; }
#if !NET20
[global::System.Runtime.CompilerServices.MethodImpl(global::System.Runtime.CompilerServices.MethodImplOptions.AggressiveInlining)]
#endif
internal static string GetResourceString(string resourceKey, string defaultValue = null) => ResourceManager.GetString(resourceKey, Culture);
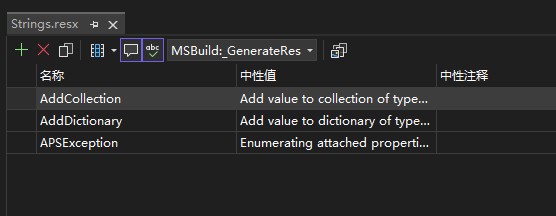
/// <summary>Enumerating attached properties on object '{0}' threw an exception.</summary>
internal static string @APSException => GetResourceString("APSException");
/// <summary>Add value to collection of type '{0}' threw an exception.</summary>
internal static string @AddCollection => GetResourceString("AddCollection");
/// <summary>Add value to dictionary of type '{0}' threw an exception.</summary>
internal static string @AddDictionary => GetResourceString("AddDictionary");
}
}
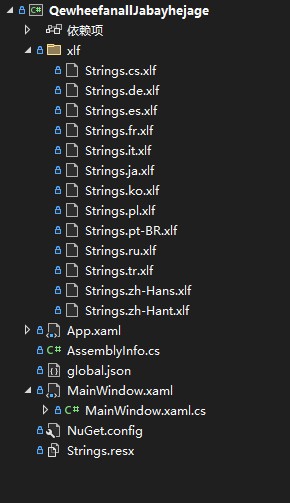
细心的伙伴还能看到,此时在项目里面被新建了 xlf 文件夹,在此文件夹内充满了各个语言文化对应的 xlf 文件。这些 xlf 文件是为翻译人员准备的,方便对接翻译平台进行翻译。每个 xlf 文件都会在 obj 文件夹生成对应的 resx 文件,再由 resx 文件生成对应的程序集
这里的 xlf 文件是采用 https://en.wikipedia.org/wiki/XLIFF 多语言翻译规范的文件,这是一个现有的规范的格式。其内容大概如下
<?xml version="1.0" encoding="utf-8"?>
<xliff xmlns="urn:oasis:names:tc:xliff:document:1.2" xmlns:xsi="http://www.w3.org/2001/XMLSchema-instance" version="1.2" xsi:schemaLocation="urn:oasis:names:tc:xliff:document:1.2 xliff-core-1.2-transitional.xsd">
  <file datatype="xml" source-language="en" target-language="zh-Hans" original="../Strings.resx">
    <body>
      <trans-unit id="APSException">
        <source>Enumerating attached properties on object '{0}' threw an exception.</source>
        <target state="translated">枚举对象“{0}”的附加属性时引发了异常。</target>
        <note />
      </trans-unit>
      <trans-unit id="AddCollection">
        <source>Add value to collection of type '{0}' threw an exception.</source>
        <target state="translated">向类型为“{0}”的集合中添加值引发了异常。</target>
        <note />
      </trans-unit>
      <trans-unit id="AddDictionary">
        <source>Add value to dictionary of type '{0}' threw an exception.</source>
        <target state="new">Add value to dictionary of type '{0}' threw an exception.</target>
        <note />
      </trans-unit>
    </body>
  </file>
</xliff>
可以看到 XLIFF 格式里面可以为翻译人员提供双语对照,也能通过 state="translated" 还是 state="new" 标记出已经翻译的还是新添加的多语言项
从这里也能看到 Microsoft.DotNet.Arcade.Sdk 的好用之处,只需添加 resx 文件,就会自动生成各个语言文化对应的 xlf 文件,方便翻译人员对接
以下是我的最简使用 Microsoft.DotNet.Arcade.Sdk 对接多语言的 csproj 项目的代码
<Project Sdk="Microsoft.NET.Sdk">

  <PropertyGroup>
    <OutputType>WinExe</OutputType>
    <TargetFramework>net9.0-windows</TargetFramework>
    <Nullable>enable</Nullable>
    <ImplicitUsings>enable</ImplicitUsings>
    <UseWPF>true</UseWPF>
  </PropertyGroup>

  <PropertyGroup>
    <MajorVersion>1</MajorVersion>
    <MinorVersion>2</MinorVersion>
  </PropertyGroup>

  <PropertyGroup>
    <GenerateResxSource>true</GenerateResxSource>

    <!-- <GenerateResxSourceOmitGetResourceString>true</GenerateResxSourceOmitGetResourceString> -->
  </PropertyGroup>

  <Import Project="Sdk.props" Sdk="Microsoft.DotNet.Arcade.Sdk" />
  <Import Project="Sdk.targets" Sdk="Microsoft.DotNet.Arcade.Sdk" />

  <ItemDefinitionGroup>
    <EmbeddedResource>
      <GenerateSource>true</GenerateSource>
      <ManifestResourceName>FxResources.$(AssemblyName).SR</ManifestResourceName>
      <ClassName>MS.Utility.SR</ClassName>
      </EmbeddedResource>
  </ItemDefinitionGroup>
</Project>
以上被注释掉的 GenerateResxSourceOmitGetResourceString 属性用来配置 Microsoft.DotNet.Arcade.Sdk 生成的类型里面,不要生成 GetResourceString 等代码。如此即可在自己程序集里面自己定义多语言获取的类型,提供更高的自由。在 WPF 仓库里面,就是自己定义的 GetResourceString 方法,用来处理多语言找不到的情况
也许有伙伴好奇在 Microsoft.DotNet.Arcade.Sdk 底层是如何对接多语言代码的生成的。事实上这部分逻辑也十分简单,从 https://github.com/dotnet/arcade 仓库可以找到明确的代码
先是在 GenerateResxSource.targets 文件里面执行对接逻辑,核心代码如下
  <Target Name="_GenerateResxSource"
          BeforeTargets="BeforeCompile;CoreCompile"
          DependsOnTargets="PrepareResourceNames;
                            _GetEmbeddedResourcesWithSourceGeneration;
                            _BatchGenerateResxSource">
    <ItemGroup>
      <GeneratedResxSource Include="@(EmbeddedResourceSGResx->'%(SourceOutputPath)')" />
      <FileWrites Include="@(GeneratedResxSource)" />
      <Compile Include="@(GeneratedResxSource)" />
    </ItemGroup>
  </Target>

  <Target Name="_BatchGenerateResxSource"
          Inputs="@(EmbeddedResourceSGResx)"
          Outputs="%(EmbeddedResourceSGResx.SourceOutputPath)">

    <Microsoft.DotNet.Arcade.Sdk.GenerateResxSource
      Language="$(Language)"
      ResourceFile="%(EmbeddedResourceSGResx.FullPath)"
      ResourceName="%(EmbeddedResourceSGResx.ManifestResourceName)"
      ResourceClassName="%(EmbeddedResourceSGResx.ClassName)"
      AsConstants="%(EmbeddedResourceSGResx.GenerateResourcesCodeAsConstants)"
      OmitGetResourceString="$(GenerateResxSourceOmitGetResourceString)"
      IncludeDefaultValues="$(GenerateResxSourceIncludeDefaultValues)"
      EmitFormatMethods="$(GenerateResxSourceEmitFormatMethods)"
      OutputPath="%(EmbeddedResourceSGResx.SourceOutputPath)" />
  </Target>
可见就是从 _BatchGenerateResxSource 调用 Microsoft.DotNet.Arcade.Sdk.GenerateResxSource 执行生成逻辑。在 _GenerateResxSource 里面将生成的文件加入构建
上面代码的 EmbeddedResourceSGResx 内容仅是取出本文在 csproj 的 ItemDefinitionGroup 里面定义的属性内容,再配合添加一些过滤条件而已
核心的 GenerateResxSource 生成类的定义代码如下
    public sealed class GenerateResxSource : Microsoft.Build.Utilities.Task
    {
        private const int maxDocCommentLength = 256;

        /// <summary>
        /// Language of source file to generate.  Supported languages: CSharp, VisualBasic
        /// </summary>
        [Required]
        public string Language { get; set; }

        /// <summary>
        /// Resources (resx) file.
        /// </summary>
        [Required]
        public string ResourceFile { get; set; }

        /// <summary>
        /// Name of the embedded resources to generate accessor class for.
        /// </summary>
        [Required]
        public string ResourceName { get; set; }

        /// <summary>
        /// Optionally, a namespace.type name for the generated Resources accessor class.  Defaults to ResourceName if unspecified.
        /// </summary>
        public string ResourceClassName { get; set; }

        /// <summary>
        /// If set to true the GetResourceString method is not included in the generated class and must be specified in a separate source file.
        /// </summary>
        public bool OmitGetResourceString { get; set; }

        /// <summary>
        /// If set to true, emits constant key strings instead of properties that retrieve values.
        /// </summary>
        public bool AsConstants { get; set; }

        /// <summary>
        /// If set to true calls to GetResourceString receive a default resource string value.
        /// </summary>
        public bool IncludeDefaultValues { get; set; }

        /// <summary>
        /// If set to true, the generated code will include .FormatXYZ(...) methods.
        /// </summary>
        public bool EmitFormatMethods { get; set; }

        [Required]
        public string OutputPath { get; set; }

        private enum Lang
        {
            CSharp,
            VisualBasic,
        }

        ...
    }
其生成逻辑是根据 C# 或 VB 进行拼接字符串方式生成的多语言代码的
读取 resw 字典也是直接使用 XDocument 的方式读取,核心代码如下
            string classIndent = (namespaceName == null ? "" : "    ");
            string memberIndent = classIndent + "    ";

            var strings = new StringBuilder();

            foreach (var node in XDocument.Load(ResourceFile).Descendants("data"))
            {
                string name = node.Attribute("name")?.Value;
                string value = node.Elements("value").FirstOrDefault()?.Value.Trim();

                strings.AppendLine($"{memberIndent}internal static string @{identifier} => GetResourceString(\"{name}\"{defaultValue});");
            }
实际的代码比我以上有删减部分略微复杂,如果大家感兴趣,还请自行去查看源代码
本文代码放在 github 和 gitee 上,可以使用如下命令行拉取代码。我整个代码仓库比较庞大,使用以下命令行可以进行部分拉取,拉取速度比较快
先创建一个空文件夹,接着使用命令行 cd 命令进入此空文件夹,在命令行里面输入以下代码,即可获取到本文的代码
git init
git remote add origin https://gitee.com/lindexi/lindexi_gd.git
git pull origin 69bd783e97b03e767017ebbbe61aad89b9a8104d
以上使用的是国内的 gitee 的源,如果 gitee 不能访问,请替换为 github 的源。请在命令行继续输入以下代码,将 gitee 源换成 github 源进行拉取代码。如果依然拉取不到代码,可以发邮件向我要代码
git remote remove origin
git remote add origin https://github.com/lindexi/lindexi_gd.git
git pull origin 69bd783e97b03e767017ebbbe61aad89b9a8104d
获取代码之后,进入 WPFDemo/QewheefanallJabayhejage 文件夹,即可获取到源代码
更多技术博客,请参阅 博客导航
本文会经常更新,请阅读原文: https://blog.lindexi.com/post/dotnet-%E8%AF%BB-WPF-%E6%BA%90%E4%BB%A3%E7%A0%81-%E5%AD%A6%E4%B9%A0%E4%BD%BF%E7%94%A8-Microsoft.DotNet.Arcade.Sdk-%E5%A4%84%E7%90%86%E4%BB%A3%E7%A0%81%E9%87%8C%E7%9A%84%E5%A4%9A%E8%AF%AD%E8%A8%80.html ,以避免陈旧错误知识的误导,同时有更好的阅读体验。
如果你想持续阅读我的最新博客,请点击 RSS 订阅,推荐使用RSS Stalker订阅博客,或者收藏我的博客导航
 本作品采用
知识共享署名-非商业性使用-相同方式共享 4.0 国际许可协议
进行许可。欢迎转载、使用、重新发布,但务必保留文章署名林德熙(包含链接:
https://blog.lindexi.com
),不得用于商业目的,基于本文修改后的作品务必以相同的许可发布。如有任何疑问,请
与我联系
。
本作品采用
知识共享署名-非商业性使用-相同方式共享 4.0 国际许可协议
进行许可。欢迎转载、使用、重新发布,但务必保留文章署名林德熙(包含链接:
https://blog.lindexi.com
),不得用于商业目的,基于本文修改后的作品务必以相同的许可发布。如有任何疑问,请
与我联系
。

无盈利,不卖课,做纯粹的技术博客
以下是广告时间
推荐关注 Edi.Wang 的公众号

欢迎进入 Eleven 老师组建的 .NET 社区

以上广告全是友情推广,无盈利